MQTT
MQTT (Message Queuing Telemetry Transport) is a lightweight messaging protocol designed for sensors and mobile devices, often used in the Internet of Things (IoT). It operates on a publish-subscribe model, where devices (clients) can publish messages to a broker, which then distributes these messages to other clients subscribed to a topic. MQTT requires a broker to work.

MQTT version v3.1.1 is fully supported by the UpBlue platform. Version v5.0 is not yet supported.
Broker
MQTT needs an MQTT broker to work. The UpBlue platform is a client that receives messages from a broker. The sensor or device we want to receive messages from, publishes these messages to the broker.
Some popular MQTT brokers include:
- Mosquitto: An open-source broker that is lightweight and suitable for small-scale IoT projects.
- EMQX: Known for its high scalability and performance, making it ideal for large-scale deployments.
- HiveMQ: Offers both open-source and commercial versions, with features tailored for enterprise use.
Is your broker on the internet instead of in your factory network? Then use the MQTT Cloud Connection — no Collector needed.
Topics
Basics
An MQTT client can subscribe or publish messages to an MQTT broker. These messages are written to a topic. A topic for example can be: /company/site1/line1/slitting.
Topics are useful for grouping or splitting datasets. In advanced use cases, topics are used for defining access to (a part of) a topic. For example: a user can have access to:
/company/site1.
But not to
/company/site2.
A client can subscribe to a topic to receive data.
Wildcards
Wildcards can be used to subscribe to multiple topics with a single subscription. There are two types of wildcards: the single-level wildcard (+) and the multi-level wildcard (#).
1 Single-Level Wildcard (+):
- This wildcard matches one level in the topic hierarchy. For example, the topic
sensors/+/temperaturewill matchsensors/slitting/temperatureandsensors/printing/temperature, but notsensors/slitting/humidity. - The topic
sensors/slitting/+will matchsensors/slitting/temperatureandsensors/slitting/humidity, but notsensors/slitting/line1/temperature. This is because of the extra/
2 Multi-Level Wildcard (#):
- This wildcard matches any number of levels in the topic hierarchy, including the parent level. For example, the topic
sensors/#will matchsensors/slitting/temperature,sensors/printing/temperature, andsensors/slitting/humidity.
These wildcards make it easier to manage and subscribe to multiple related topics without needing to specify each one individually.
Create a Connection with MQTT
Name connection
A connection is created within an organisation. Go to the UpBlue Management Environment to open an organisation. Go to the connection page to create a connection. You can also create a connection from the collector page. This will automatically attach the connection to the collector. You can always detach the connection after and attach it to a different collector.
Choose the Local source and select the MQTT connection type. Give the connection a name. This name is only for identification and can be changed later.
Labels
Labels tell UpBlue where the data of this connection comes from. The Enterprise and Site labels are prefilled. Fill in the location as far as it makes sense: Area, Cell, Unit. Labels are optional and can be overridden per rule. Read more about labels.
Think carefully about the labels you choose! Changing them later will have effect on your dashboards! Read more about this here.
Create Connection
Connection details
Fields
Connection name
This is the name given earlier when creating the connection. This is only for identification in the UpBlue Management Environment.
Protocol
MQTT supports two types of protocols: TCP (default) or Websocket. If you don’t know what protocol your broker is using, it is probably MQTT TCP. Websocket is primarily used when only http traffic is allowed and port 1883 or 8883 are closed. Since we are probably getting local MQTT traffic, this is not an issue.
Address and Port
This is the address of the MQTT broker. Ports frequently used per protocol:
- TCP: 1883
- Secure TCP: 8883
- Websocket: 80
- Secure Websocket: 443
No need to add http://, https:// or something else. Based on the selected Protocol and SSL enabled or not, the right prefix will be used.
If you use a prefix, the connection will not work.
Example of an MQTT address: 192.168.0.152 with port 1883.
Don’t forward any ports in your router! The collector runs locally and the connection will run and test locally on the Collector. Use a local IP address or hostname.
Username and Password
If the MQTT broker uses a username and/or password, fill these fields. Leave empty for no authorization.
SSL
If the broker uses SSL, enable this option. If using a local broker, SSL is normally not used.
Test connection
If the button is gray, first attach a collector. If there are no collectors available, first install a collector. For more details, see the collector installation page.
Rules
A rule is configuration that will retrieve a specific set of information from the MQTT broker. It instructs the Collector to retrieve this information and send it to the Cloud.
Fields
Name
The name is only used for identification in the UpBlue Platform.
MQTT topic
This is the topic this rule will listen to. See the Topic section how topics work.
If you are not sure what kind of messages, or on what topic messages are published, you can just use # as test. Test the rule and view what messages are being published. Max 20 messages will be received by the test.
Don’t publish this rule with the # topic. If the broker publishes a lot of messages, all these messages are processed by the collector.
Tag source
The tag is the most important label. This defines what the value is. For example a tag can be “Temperature” or “Speed”. There are three ways to define a tag.
- Manual
- Extract from the topic name
- Extract from the body
1. Manual
Just select or create the tag. This is used when the selected topic only supplies values for one tag.
2. Extract from the topic name
When a wildcard is used in the topic, it can be useful to extract the tag name from the topic.
For example the subscription topic is: sensors/slitting/+.
The + is on the third (3) level. Set Topic level to extract from to 3.
If a message is received on sensors/slitting/temperature, the tag will be temperature.
If another message is received on sensors/slitting/humidity, the tag will be humidity.
In this use case, multiple tags can be processed by one rule!
3. Extract from the body
If the MQTT message is a JSON payload and the payload contains the tag, the tag can be extracted from the payload.
For example the payload is this:
{
  "value": 21.2,
  "tag": "temperature"
}
Set the tag field to: tag
Result should be this:
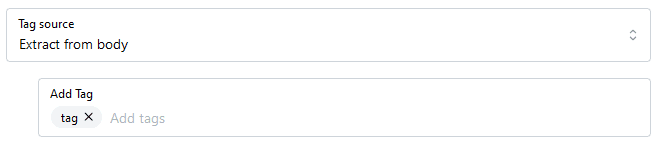
If the JSON is this:
{
  "value": 21.2,
  "meta": {
    "tag": "temperature"
  }
}
Result should be this:
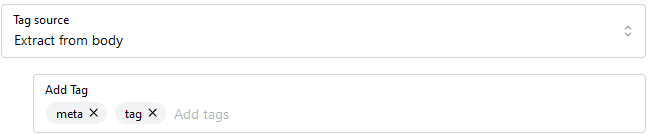
The tag will be retrieved from the JSON payload with the selected keys.
Time source
Each value needs a time. There are two options to define the time.
- Use the collector time
- Extract the time from the body
1. Use the collector time
When a message is received, the time at that moment is used as time. There can be a slight delay between the moment the value is created by the sensor and the collector time. Also, it is important that the time on the machine the collector is running on is correct.
2. Extract the time from the body
If the MQTT message is a JSON payload and the payload contains the time, the time can be extracted from the payload. For example the payload is this:
{
  "value": 21.2,
  "tag": "temperature",
  "time": "1681981694131000"
}
Result should be this:
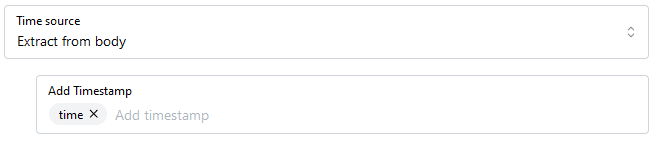
This time will be used as time for the value.
Time can be in the following formats:
2024-01-02 15:04:05.9992023-04-10 14:35:43.188 +02002023-04-10 14:35:43 +02002024-01-02T15:04:05.999Z2024-01-02 15:04:052024-01-02T15:04:05Z2024-01-02Will be rounded to midnight1681981694131000000nanoseconds1681981694131000microseconds1681981694131milliseconds1728904106seconds
The value
If the payload of the message is just a number, like 21.2, it is used as the value directly. Nothing to configure.
If the payload is a JSON message, add the JSON to value transformation to pick the value out of the payload. With the JSON filter transformation you can skip messages that are not meant for this rule. Read more about transformations.
For example the payload is this:
{
  "value": 21.2,
  "tag": "temperature"
}
Add a JSON to value transformation with path value.
If the JSON contains values for multiple tags:
{
  "values": {
    "temperature": 21.2,
    "humidity": 78.6
  }
}
You need to create two rules. One for temperature with path values → temperature, one for humidity with path values → humidity.
Transform values
Transformations clean and convert the values of this rule before they are stored: deduplication, counters, timers, text to value and more. Read all about transformations here.
Labels
When the tag is extracted from the topic or body, you can override or add labels on the rule. Read more about this here.
Test rule
A new window will open with the test results. Green rows mean test ok, these values will be saved to UpBlue when the connection is sent to the collector. Red rows are not ok. Open the row to see why the payload is omitted.